Cyber Monday DEEP Discounts Extended. From Free Shipping, Gift Certificates, to our highest offered discount codes ever! Check out the Sales Details here.
How to Install Vinyl Lettering, Graphic, and Decals
How do you install vinyl lettering, decals, and large exterior graphic stickers? Take your time, follow the directions below and within 10 minutes you'll have your installation complete. But first, some preparatory information:
Decal Installation Surface Preparation
All surfaces must be thoroughly cleaned before applying your vinyl graphics.
Follow the instructions below for specific material cleaning procedures.
Decals on Plastics and Glass
Thoroughly wipe surface clean with a window cleaner. Remove any dried
matter such as tape or glue with a single edge razor blade. If you are
planning to use acrylic, remove the protective liner from the acrylic 24
hours prior to application vinyl graphic. This will allow any air bubbles
(outgassing) to dissipate from the acrylic. If this is not observed you
may find air bubbles form under your graphic within a couple of days..
Decals on Painted Metals and Base
Metals
These surfaces may be cleaned with a solvent such as Naphtha, Xylol
or Lacquer Thinner. Dry the surface with a lint free cloth before the solvent
evaporates. Freshly painted surfaces should be dry for at least 72 hours
prior to application of the vinyl graphics.
Decals on Interior Painted Surfaces
Surfaces may be cleaned with any household cleaner such as Fantastic or
409. Wipe area clean and dry with a lint free cloth before applying the
vinyl graphics. Freshly painted surfaces should be dry for at least 72
hours prior to application of the vinyl graphics.
Decal Installation Temperature Requirements
The temperature of the room and the temperature of the intended surface
should be between 45 and 90 degrees Fahrenheit for best results. Very high
humidity (above 90 percent) may effect the application process.
Materials Needed for Decal Installation
Small cutting knife or razor blade. (an Exacto Knife is ideal for the job)
A Spray bottle filled with a mixture of dish soap and water.
The mixture ratio is; 3 drops of soap to 1 pint of water
Plastic Squeegee (supplied)
Dry Towel
2" Roll of Masking Tape
Installation Instructions
The graphic consists of three separate pieces.
Pre-mask
Vinyl Graphic
Liner
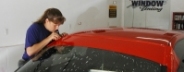
Using small tabs of masking tape, tack the graphic to the intended surface . This is to insure proper placement before the liner is removed.
Apply a single horizontal strip of 2" masking tape to the top of the
graphic. The strip of should be split between the graphic and the intended
surface with 1" on each side (as shown). This strip will be used as a hinge
that will insure the graphic does not move during the application process.
Hold the bottom edge of the hinged graphic away from the intended surface
and remove the liner to reveal the sticky backing of the vinyl. Save this
piece of liner for use later in the application process.
CAUTION::
Do not let the exposed graphic touch the intended surface. The
back of the graphic is very tacky and will tightly adhere to the surface.
If the placement is not correct, removing the graphic for re-placement
will be very difficult or impossible without causing damage to the vinyl.
To assist in proper placement, spray the intended surface with the
mixture of soap and water. (This coating of water reduces the tackiness
of the vinyl, letting you lift and re-place the graphic if necessary.
While still holding the hinged graphic away from the intended surface.
Using the squeegee and starting from the top, begin to marry the graphic
to the intended surface.
Notes:
Work from top to bottom.
Do not let the entire graphic fall onto the intended surface.
If lines or creases develop, lift and re-place the graphic.
Once the graphic is in proper position and lying perfectly flat on
the intended surface, you can now start forcing the water out from beneath
the graphic. Starting from the center working outward, use firm strokes
with the squeegee to force the water out from beneath the individual letters
or elements contained in your graphic.
After all letters and elements have had most of the water squeegeed
out from beneath them, it is now time to remove the pre-mask from the graphic
and reveal the final product. To remove the pre-mask without difficulty,
spray with water and soap mixture and wait a minute or two for the pre-mask
paper to become soggy. Gently remove the pre-mask. Be careful not to pull
the graphic up with the pre-mask paper.
Squeegee out any remaining water bubbles using the piece of left over
liner. Lay the piece of left over liner over the graphic, with shiny side
of liner facing you. Proceed to apply hard pressure to squeegee out any
remaining water or air bubbles.
Still need help? Order our Lettering / Decal /
- $12.50
Custom Kit includes:1 - Deluxe Squeegee, 1 - Snap knife 1- Instruction Video, and 1 - Bottle of application fluid. Our Application Fluid contains an exclusive adhesive activator, which sets the vinyl adhesive and speeds drying time. The special fluid also helps eliminate unwanted bubbles. Highly Recommended!


 Still need help? Order our Lettering / Decal /
- $12.50
Still need help? Order our Lettering / Decal /
- $12.50